3. 实现NoteView
在之前的章节,我们已经初始化好了程序的整体框架,是时候向这个框架里填入内容了。
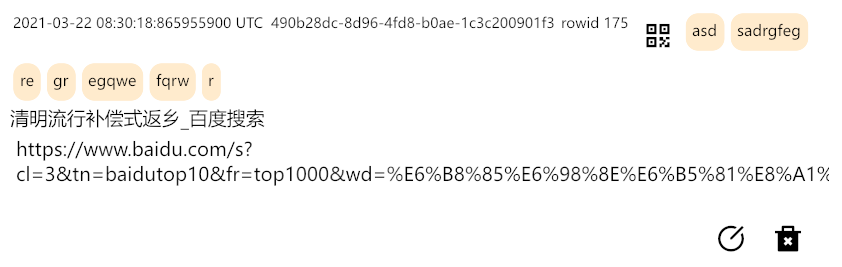
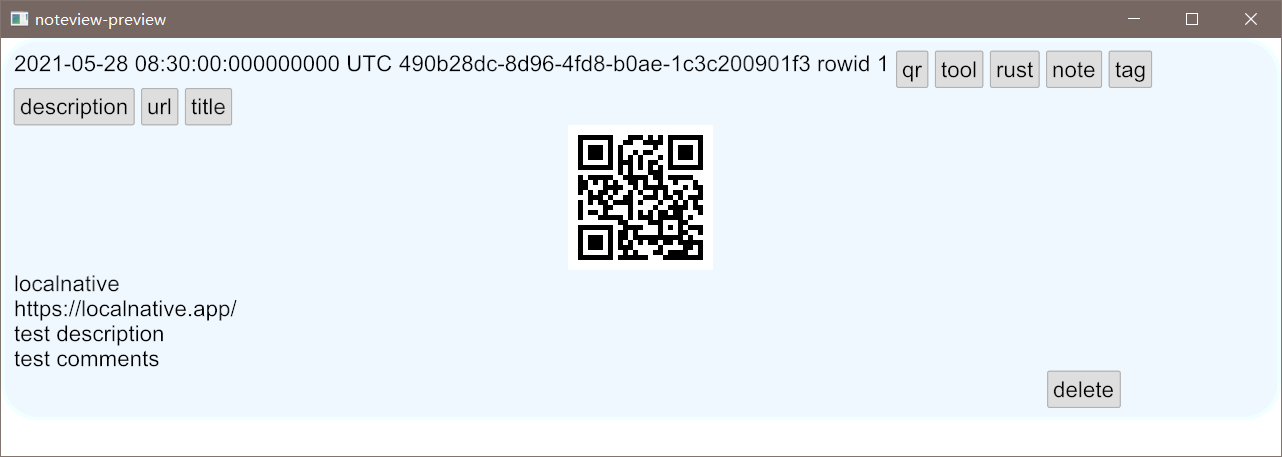
本章我们将实现如下图所示的Note结构体的视图,并且通过preview这个feature来预览我们实现的效果。
创建新模块
我们先创建一个note模块:
// 在 lib.rs 内
+  mod note;

use iced::Command;

... 之前的内容
同时在src文件夹下创建一个note.rs文件,这便是我们的note模块了。
// 在 note.rs 内
// 我们需要展示的数据来自core代码库的Note结构体,我们直接引入即可
use localnative_core::Note;
简易实现
我们将要实现的内容是更为简易的版本:
- 点击标签,会搜索该标签相关内容
- 点击地址,将会通过浏览器打开相关地址
- 点击删除按钮,将会删除当前note
- 点击二维码按钮,会展示由URL地址生成的二维码
我们不需要去实现更为复杂的编辑页面,只需要实现以上功能即可。
// 在 note.rs 内
// 我们定义一个NoteView的结构体,给该结构体实现相关方法
#[derive(Debug)]
pub struct NoteView {
    note: Note,
    // 标签的数量不是固定的,因此我们需要Vec来保存标签
    // Note中的标签使用String来保存,通过逗号隔离每个标签
    // 我们需要自己处理,将标签转换成tags
    tags: Vec<Tag>,// Tag我们将会下面定义
    // iced 中的button在构建的时候,需要我们提供一个&mut State
    // 我们将State放到NoteView里面保存
    // 我们只需要两个State就够了,因为Tag按钮的State我们将单独放到每个Tag结构体中去
    open_url: iced::button::State,
    open_qrcode: iced::button::State,
    delete: iced::button::State,
    // 我们通过bool值来保存当前note是否开启
    // 和button一样qr_code组件需要提供&mut qr_code::State
    // 默认的note是关闭二维码的,因此我们在此处的state设置为Option
    qrcode: Option<iced::qr_code::State>,
}
// 我们只需要保存标签的名字和对应按钮的状态即可
pub struct Tag {
    name: String,
    open_tag: iced::button::State,
}
// 最后,就像是我们当初实现Application的时候一样
// 如果我们想要处理消息,我们就需要定义一个Message来保存我们可能会用到的结构体
#[derive(Debug,Clone)]
pub enum Message {
    // 我们将会在需要对应msg的时候再来补充
}
虽然我们已经用到了Note,但是实际上仍然不知道这个结构体是怎样构建的,通过IDE的代码跳转功能,我们可以看到Note的定义:
// localnative_core内部
#[derive(Serialize, Deserialize, Debug, PartialEq, Eq, Clone)]
pub struct Note {
    pub rowid: i64,
    pub uuid4: String,
    pub title: String,
    // iced并没有提供link组件,我们只能使用button来代替
    // 同时我们需要一个额外的依赖帮助我们在点击url的时候可以打开该url
    pub url: String,
    // tags是通过','号将每个tag进行分割保存的
    // 我们需要做的转换是:
    // String -> Vec<Tag>
    pub tags: String,
    pub description: String,
    pub comments: String,
    // annotations这个字段是一个历史遗留字段
    // 在note的前端我们不需要对其进行任何展示
    pub annotations: String,
    pub created_at: String,
    // is_public是后端内部使用字段,同样不需要我们关注
    pub is_public: bool,
}
Note结构体通过derive宏实现的trait多达五个,其中
PartialEq和Eq是用于比较,Serialize是序列化,Deserialize是反序列化,Debug是调试。值得注意的是实现的序列化相关的trait,虽然我们实现的桌面端GUI是直接和核心库进行交互,但是核心库由于考虑到和web端交互以及移动端交互,因此在返回结果的时候,返回的是json字符串,实现序列化之后,可以帮助我们方便的在json字符串和Rust结构体之间轻松切换。
我们已经知道了Note结构体,现在我们给NoteView实现一个From<Note>,实现这个trait之后我们就可以从Note获取一个NoteView了。
// ... 紧接上面代码
// 在 note.rs 内
// 实现该trait之后,我们接收到note,通过into方法即可从Note转换到NoteView
impl From<Note> for NoteView {
    fn from(note: Note) -> Self {
        let tags: Vec<Tag> = note
        .tags
        // 数据库中的tag是通过逗号隔离的
        // 我们只需要通过逗号分离即可
        .split(',')
        // 有时在分离中会产生一些空白字符串我们需要将其过滤掉
        .filter(|name| !name.is_empty())
        // 过滤好的名字映射到Tag
        .map(|name| {
            Tag{
                name:name.to_owned(),
                open_tag:button::State::new()
            }
        })
        // 最后将映射好的Tag收集到Vec即可
        .collect();
        NoteView {
            note,
            tags,
            open_url: button::State::new(),
            open_qrcode: button::State::new(),
            delete: button::State::new(),
            // 默认关闭二维码
            qrcode: None,
        }
    }
}
实现了这个trait之后,我们可以给我们的NoteView实现方法了,主要需要我们实现的就两个方法,一个是用来代表视图的view方法,这个方法我们需要用到NoteView中保存的诸如button::State之类的可变引用,因此我们传递&mut self作为我们的方法参数。另一个是update, 用来对消息做出反应。
// ... 紧接上面代码
// 在 note.rs 内
// 引用应当放在当前模块最顶端更为合适
use iced::{button, qr_code, Button, Column, Element, QRCode, Row, Text, Rule};

impl NoteView {
    // 我们返回一个Element结构体,这个结构体需要一个msg泛型,该泛型要求实现Send + Debug
    // iced中的组件都实现了Into<Element>,所以我们只需要正常写组件,最后返回的时候into()即可
    pub fn view(&mut self) -> Element<Message> {
        // 我们在以下操作中需要同一个结构体的不同部分的多个可变应用
        // 当前Rust所有权系统并没有那么智能,也就是即使我们在理论上并没有多次可变借用统一个字段
        // 但是Rust所有权因为不那么智能,会给我们报错(这个问题在未来将会被解决)
        // 因此我们通过模式匹配,将一个完整的结构体解构成多个部分
        let Self {
            note,
            tags,
            open_url,
            open_qrcode,
            delete,
            qrcode,
        } = self;
        // qrcode构建需要一个&State,因此我们通过as_ref()将&mut Option<State>转变为Option<&State>
        // 最后使用map将state映射到我们需要构建的QRCode组件即可
        let qrcode = qrcode.as_ref().map(|state| QRCode::new(state));
        // 接着是三个Button控件,值得注意的是on_press方法传递的是一个Message
        // 这部分相当有趣,我们将在后续内容中介绍这相当有趣的部分
        let url = Button::new(open_url, Text::new(note.url.as_str())).on_press(Message::OpenUrl);
        let delete = Button::new(delete, Text::new("delete")).on_press(Message::Delete);
        let qrcode_button = Button::new(open_qrcode, Text::new("qr")).on_press(Message::QRCode);
        // 我们构建一个Row在同一行放入用于展示的数据,分别是创建note的时间,uuid号,以及rowid和qr按钮
        let row = Row::new()
            .push(Text::new(note.created_at.as_str()))
            .push(Text::new(note.uuid4.as_str()))
            .push(Text::new(format!("rowid {}", note.rowid)))
            .push(qrcode_button);
        // 接着我们通过fold,将上述的row传入tags中,创建不同的tag按钮放入同一行
        let row = tags.iter_mut().fold(row, |row, tag| {
            let Tag { name, open_tag } = tag;
            let tag_button = Button::new(open_tag, Text::new(name.as_str()))
                .on_press(Message::Search(name.to_owned()));
            row.push(tag_button)
        });
        // 我们需要展示的是多行,因此在创建号row之后,需要一个column来储存不同的行
        let mut column = Column::new().push(row);
        // 判断是否存在qrcode,存在就放入,不存在就跳过,
        //同理后续判断四个数据是否为空,不为空的情况下放入column中
        if let Some(qrcode) = qrcode {
            column = column.push(qrcode);
        }
        if !note.title.is_empty() {
            column = column.push(Text::new(note.title.as_str()));
        }
        if !note.url.is_empty() {
            // 这里我们push的是之前创建的url按钮
            column = column.push(url);
        }
        if !note.description.is_empty() {
            column = column.push(Text::new(note.description.as_str()));
        }
        if !note.comments.is_empty() {
            column = column.push(Text::new(note.comments.as_str()));
        }
        column = column.push(
            // 最后一行我们需要放入一个delete按钮,这个按钮大概在左右7比1的位置
            Row::new()
            // Rule在构建的时候可以选择水平或者垂直方向,传入的参数是生成的直线的平移位置
            // 我们将会后面预览的时候看到Rule生成的直线,同时如果修改传入的参数该直线位置会有变动
            // 在最终版本我们是不需要直线的,因此在此传入一个任意的数即可
            .push(Rule::horizontal(0))
            .push(Rule::horizontal(0))
            .push(Rule::horizontal(0))
            .push(Rule::horizontal(0))
            .push(Rule::horizontal(0))
            .push(Rule::horizontal(0))
            .push(Rule::horizontal(0))
            .push(delete)
            .push(Rule::horizontal(0))
        );
        // 最后不要忘记调用into
        column.into()
    }
    // update方法除了&mut self参数之外,还需要一个Message参数用于判断需要处理哪一个消息
    pub fn update(&mut self, msg: Message) {
        match msg {
            // 我们定义一个open方法,传入参数即可
            Message::OpenUrl => open(self.note.url.as_str()),
            Message::Delete => {
                // 我们无法在当前的层面上处理这个操作,只需要留白,等待上层结合的时候处理就行
                println!("delete");
            }
            Message::QRCode => match self.qrcode {
                Some(_) => {
                    // 当qrcode是some的时候,我们只需要拿出来dorp掉即可
                    self.qrcode.take();
                }
                None => {
                    // 当qrcode是none的时候,我们只需要创建一个新的state即可
                    self.qrcode
                        .replace(qr_code::State::new(self.note.url.as_bytes()).unwrap());
                }
            },
            Message::Search(tag) => {
                // 同delete,需要上层处理
                println!("search tag: {}", tag);
            }
        }
    }
}
// 我们需要加入新的依赖来帮我们完成打开浏览器的操作
fn open(url: &str) {
    todo!()
}
同时,因为在构建view的时候,我们得到了需要的message,因此Message变成了这样:
// 在 note.rs 内
#[derive(Debug, Clone)]
pub enum Message {
    OpenUrl,
    Delete,
    QRCode,
    Search(String),
}
大部分视图都实现了,是时候验证我们的视图是否需要进行调整了,通过之前定义的previewfeature,我们可以给我们的NoteView实现SandBox:
// ... 紧接上面的代码
// 在 note.rs 内
// 我们使用cfg宏来指示当前的这部分代码只有在preview开启的时候才会参与编译
#[cfg(feature = "preview")]
// SandBox只有preview开启的时候才用到,因此不单独引入,直接iced::SandBox
// 这个trait是iced::Applicaltion的简略版本,简化了很多实现,用来实现预览最为合适
impl iced::Sandbox for NoteView {
    // 同Application一致,需要我们指定关联类型
    type Message = Message;
    // 我们任意构建一个Note来预览我们的视图
    fn new() -> Self {
        Note{
            rowid: 1,
            uuid4: "490b28dc-8d96-4fd8-b0ae-1c3c200901f3".to_owned(),
            title: "localnative".to_owned(),
            url: "https://localnative.app/".to_owned(),
            tags: "tool,rust,note,tag,description,url,title".to_owned(),
            description: "test description".to_owned(),
            comments: "test comments".to_owned(),
            annotations: "".to_owned(),
            created_at: "2021-05-28 08:30:00:000000000 UTC".to_owned(),
            is_public: true,
        }.into()
    }
    // 应用程序窗口标题
    fn title(&self) -> String {
        "noteview-preview".to_owned()
    }
    // 直接调用我们之前实现的update即可
    fn update(&mut self, message: Self::Message) {
        self.update(message)
    }
    // 直接调用之前实现的view即可
    fn view(&mut self) -> Element<'_, Self::Message> {
        self.view()
    }
}
创建好之后,我们同时创建一个previews/noteview.rs文件以及将其作为可执行文件添加到Cargo.toml里面去:
# 在 Cargo.toml 内
    [[bin]]
    name = "ln"
    path = "./src/bin.rs"

    [[bin]]
    name = "preview-example"
    path = "./previews/exam.rs"
    required-features = ["preview"]

+  [[bin]]
+  name = "noteview"
+  path = "./previews/noteview.rs"
+  required-features = ["preview"]
// 在 /previews/noteview.rs 内
// 我们需要使用SandBox的run方法,因此需要在这里引入
use iced::Sandbox;
// NoteView需要在lib.rs内pub出来
use ln_iced::NoteView;
// 直接run就行
fn main() -> iced::Result {
    NoteView::run(ln_iced::settings())
}
// 在 lib.rs 内
+ pub use note::NoteView;
完成这些之后我们就可以run我们的预览了:
cargo run --bin noteview
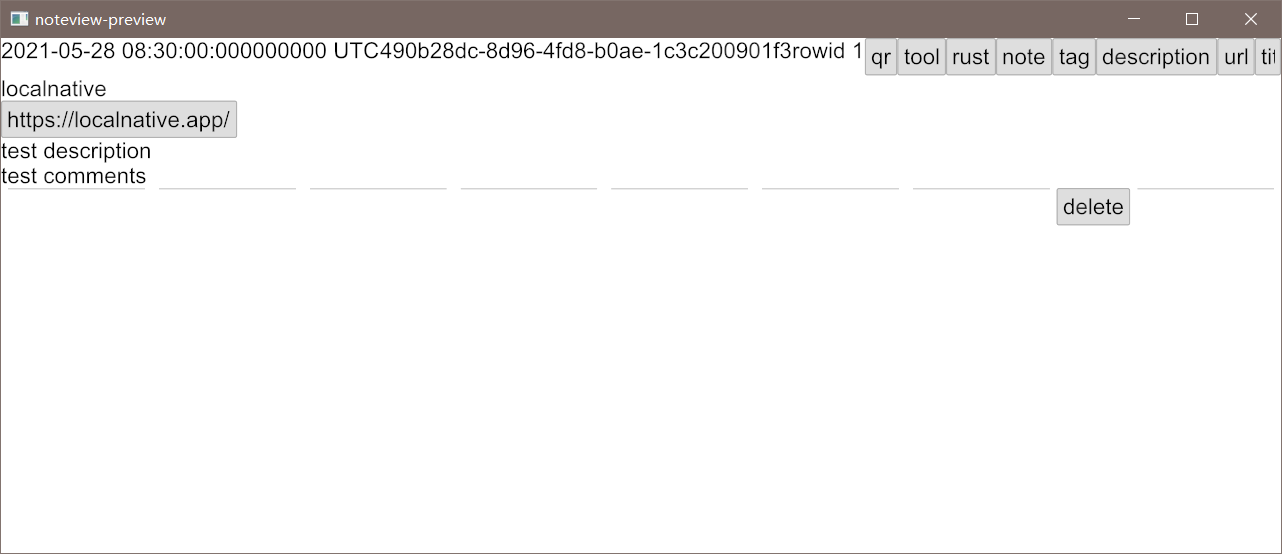
正如上图所展示的,当前我们获得了一个十分简陋的UI,接下来我们将要解决以下问题:
- 点击网址能够正确跳转
- 消除构建delete按钮时所使用rule出现的白线
- tag太长导致后面的tag看不到,我们需要使用wrap控件来帮助我们完成自动换行
- 二维码出现的位置不在中间,我们需要将其置中
正确跳转链接
之前我们的open函数仅仅使用了todo!()宏来留白,如果我们点击预览中的URL按钮实际上会触发panic,我们的程序会崩溃掉。
现在我们将正确实现这个功能,只需要引入一个crate调用它的函数帮助我们处理即可:
# 在 Cargo.toml 内
[dependencies]
localnative_core = { path = "../localnative/localnative-rs/localnative_core" }
+ open = "1"
[dependencies.iced]
version = "0.3.0"
default-features = false
// 在 note.rs 内
fn open(url: &str) {
// 更好的处理方式是通过log打印,甚至保存下信息,当前只是简易实现,后续我们会替换为log
+    if let Err(err) = open::that(url) {
+       println!("open url fail:{:?}", err);
+    }
}
此时保存之后运行noteview已经可以正确跳转链接了。
主题
为了在不远的将来实现主题,我们需要新建一个style模块:
// 在 lib.rs 内
mod note;
+ mod style;
同时新建src/style.rs文件:
// 在 style.rs 内
use iced::Color;
use iced::{button, rule};

// 我们定义一个Theme结构体用来管理主题的状态
// 实现了 PartialEq, Eq 是为了用于比较
#[derive(Debug, Clone, Copy, PartialEq, Eq)]
pub enum Theme {
    Light,
    Dark,
}

// 定义一个Transparent,用来表示透明风格,这将用于各种图标,暂时还用不到
pub struct Transparent {
    theme: Theme,
}
// iced内建了多个StyleSheet,我们当前只需要实现button的即可
impl button::StyleSheet for Transparent {
    fn active(&self) -> button::Style {
        // 文本颜色随着主题而变化
        let text_color = match self.theme {
            Theme::Light => Color::BLACK,
            Theme::Dark => Color::WHITE,
        };
        button::Style {
            background: None,
            border_radius: 0.0,
            border_width: 0.0,
            // 边框颜色置为透明
            border_color: Color::TRANSPARENT,
            text_color,
            // 这个语法之前提到过了,Rust会自动将未指定的项设置的和..后的结构体的值一致
            ..Default::default()
        }
    }
}
// 相当于Transparent的构造方法
pub fn symbol(theme: Theme) -> Transparent {
    Transparent { theme }
}

// 用来表示链接的主题
pub struct Link {
    theme: Theme,
}
// 和Transparent不同的地方在于除了实现active之外,我们还实现了hovered下的主题
// 当鼠标悬浮于该链接上时,链接颜色会变
impl button::StyleSheet for Link {
    fn active(&self) -> button::Style {
        let text_color = match self.theme {
            Theme::Light => Color::BLACK,
            Theme::Dark => Color::WHITE,
        };
        button::Style {
            background: None,
            border_radius: 0.0,
            border_width: 0.0,
            // 边框颜色置为透明
            border_color: Color::TRANSPARENT,
            text_color,
            shadow_offset: Default::default(),
        }
    }

    fn hovered(&self) -> button::Style {
        button::Style {
            text_color: Color::from_rgb8(26, 13, 171),
            ..self.active()
        }
    }
}
// Link的构建方法
pub fn link(theme: Theme) -> Link {
    Link { theme }
}

// 用来表示Rule的透明风格
pub struct TransparentRule;
impl rule::StyleSheet for TransparentRule {
    fn style(&self) -> rule::Style {
        // 当我们把颜色置为透明时,另外三个对于线条的属性就毫无意义,因此随意设定即可
        rule::Style {
            color: Color::TRANSPARENT,
            width: 1,
            radius: 0.0,
            fill_mode: rule::FillMode::Full,
        }
    }
}
// 透明rule的构建方法
pub fn rule() -> iced::Rule {
    iced::Rule::horizontal(0).style(TransparentRule)
}
构建好主题之后,只需要回到note.rs更改主题即可:
// 在 note.rs 内
- use iced::{button, qr_code, Button, Column, Element, QRCode, Row, Rule, Text};
+ use iced::{button, qr_code, Button, Column, Element, QRCode, Row, Text};
use localnative_core::Note;

+ use crate::style;
/*
    ... 其它之前中间的代码
*/
impl NoteView {
-  pub fn view(&mut self) -> Element<Message> {
+  pub fn view(&mut self, theme: style::Theme) -> Element<Message> {
        let Self {
            note,
            tags,
            open_url,
            open_qrcode,
            delete,
            qrcode,
        } = self;
        let qrcode = qrcode.as_ref().map(|state| QRCode::new(state));
-      let url = Button::new(open_url, Text::new(note.url.as_str())).on_press(Message::OpenUrl);
+      let url = Button::new(open_url, Text::new(note.url.as_str()))
+          .style(style::link(theme))
+          .on_press(Message::OpenUrl);
        let delete = Button::new(delete, Text::new("delete")).on_press(Message::Delete);
        let qrcode_button = Button::new(open_qrcode, Text::new("qr")).on_press(Message::QRCode);
        let row = Row::new()
        // 添加spacing属性之后,同一行每个元素都会有5的间隔
+       .spacing(5)
            .push(Text::new(note.created_at.as_str()))
            .push(Text::new(note.uuid4.as_str()))
            .push(Text::new(format!("rowid {}", note.rowid)))
            .push(qrcode_button);
        let row = tags.iter_mut().fold(row, |row, tag| {
            let Tag { name, open_tag } = tag;
            let tag_button = Button::new(open_tag, Text::new(name.as_str()))
                .on_press(Message::Search(name.to_owned()));
            row.push(tag_button)
        });
        let mut column = Column::new().push(row);
        if let Some(qrcode) = qrcode {
-          column = column.push(qrcode);
+          column = column.push(
+              Row::new()
+                  .push(style::rule())
+                  .push(qrcode)
+                  .push(style::rule()),
            );
        }
        if !note.title.is_empty() {
            column = column.push(Text::new(note.title.as_str()));
        }
        if !note.url.is_empty() {
            column = column.push(url);
        }
        if !note.description.is_empty() {
            column = column.push(Text::new(note.description.as_str()));
        }
        if !note.comments.is_empty() {
            column = column.push(Text::new(note.comments.as_str()));
        }
        column = column.push(
            Row::new()
-          .push(Rule::horizontal(0))
-          .push(Rule::horizontal(0))
-          .push(Rule::horizontal(0))
-          .push(Rule::horizontal(0))
-          .push(Rule::horizontal(0))
-          .push(Rule::horizontal(0))
-          .push(Rule::horizontal(0))
-          .push(delete)
-          .push(Rule::horizontal(0))
+          .push(style::rule())
+          .push(style::rule())
+          .push(style::rule())
+          .push(style::rule())
+          .push(style::rule())
+          .push(style::rule())
+          .push(style::rule())
+          .push(delete)
+          .push(style::rule()),
        );
        column.into()
    }
    // ...其它之前的实现
}

#[cfg(feature = "preview")]
impl iced::Sandbox for NoteView {
    /*
        ...其它的之前的实现
    */
    fn view(&mut self) -> Element<'_, Self::Message> {
-       self.view()
        // 我们暂时只需要使用Litght主题测试就好,后续添加主题切换按钮的时候再做切换
+      self.view(style::Theme::Light)
    }
}
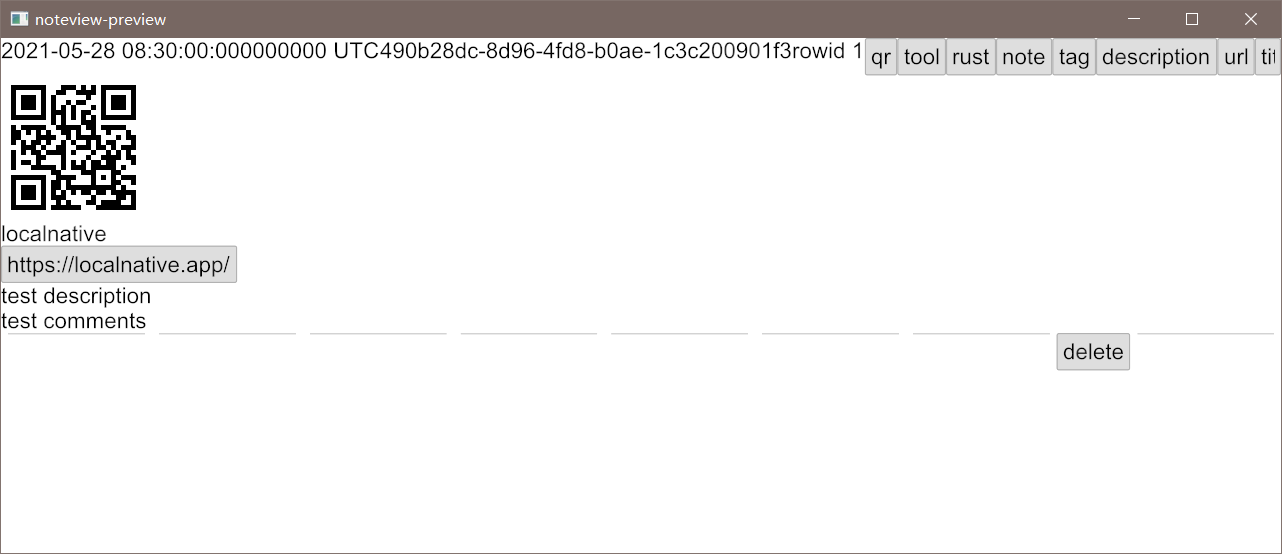
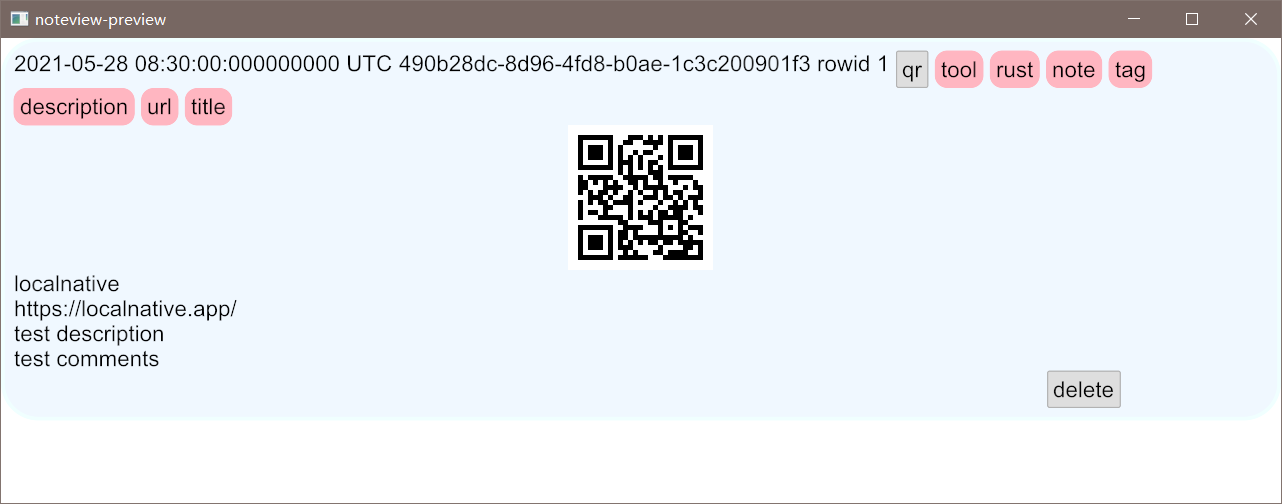
经过重构,我们之前提出的1、2、4三个问题都解决了,运行一下预览,看看我们的成果:
cargo run --bin noteview
接下来我们将引入Wrap控件,将我们的tag给放入这里面,这样我们的问题3也就同样被解决了。首先我们引入iced_aw这个crate,这是一个iced官方的额外控件crate,目前还没有发布到crate.io,因此我们只能通过git的方式引入到我们的项目中,还是老方法,如果网速不佳,请用国内镜像:
# 在 Cargo.toml 内
[dependencies]
localnative_core = { path = "../localnative/localnative-rs/localnative_core" }
open = "1"

+ [dependencies.iced_aw]
# 网速太差可以考虑使用:https://gitee.com/downtime/iced_aw
+ git = "https://github.com/iced-rs/iced_aw"
+ branch = "main"
+ default-features = false
+ features = ["wrap"]
我们开启wrap的feature之后,便可以将tag都放到wrap内了:
// 在 note.rs -> impl NoteView -> view 内
        let row = Row::new()
            .spacing(5)
            .push(Text::new(note.created_at.as_str()))
            .push(Text::new(note.uuid4.as_str()))
            .push(Text::new(format!("rowid {}", note.rowid)))
            .push(qrcode_button);
-       let row = tags.iter_mut().fold(row, |row, tag| {
-           let Tag { name, open_tag } = tag;
-           let tag_button = Button::new(open_tag, Text::new(name.as_str()))
-               .on_press(Message::Search(name.to_owned()));
-           row.push(tag_button)
-       });
+       let wrap = tags
+           .iter_mut()
+           .fold(iced_aw::Wrap::new().spacing(5).push(row), |wrap, tag| {
+               let Tag { name, open_tag } = tag;
+               let tag_button = Button::new(open_tag, Text::new(name.as_str()))
+                   .on_press(Message::Search(name.to_owned()));
+               wrap.push(tag_button)
+           });
-       let mut column = Column::new().push(row);
+       let mut column = Column::new().push(wrap);
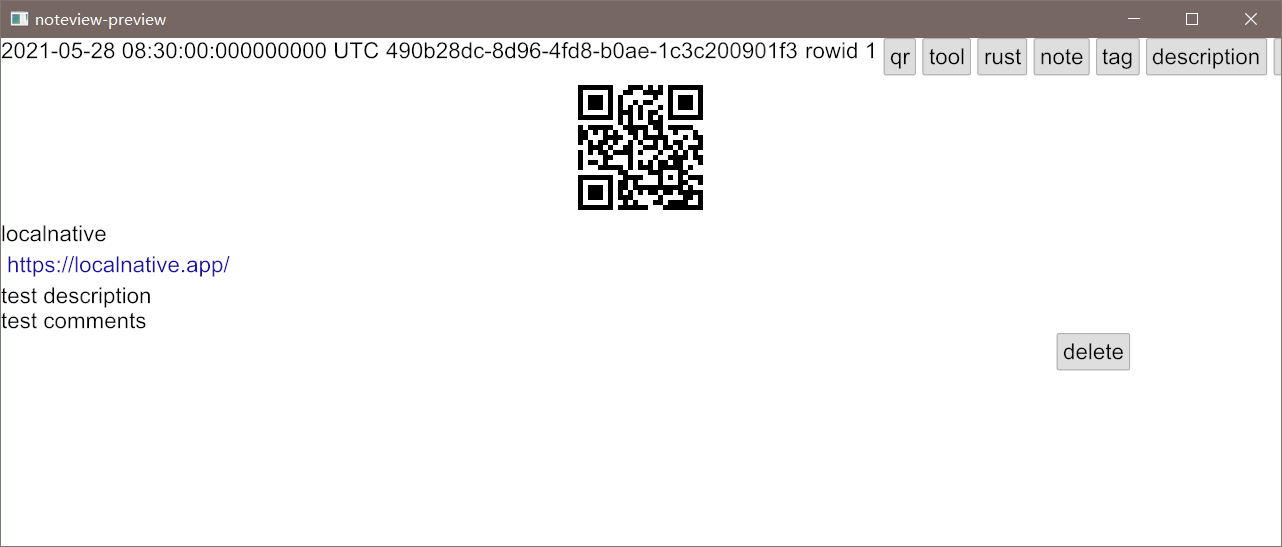
运行之后:

我们得到了一个还算不错的结果,但是说实话实在是太丑了,接下来我们将要给他做一些美化,同时也要为之后我们即将实现的暗色主题做准备。同时,如果你注意到之前的代码,会发现有不少地方是可以进行抽象的,比如我们在构建一个7:1位置的delete按钮时,重复的push了一堆Rule:
// 在 note.rs 内
    column = column.push(
        Row::new()
        .push(style::rule())
        .push(style::rule())
        .push(style::rule())
        .push(style::rule())
        .push(style::rule())
        .push(style::rule())
        .push(style::rule())
        .push(delete)
        .push(style::rule()),
        );
// 为了减少重复,也为了后续我们调用rule的时候,能够使用更优雅的方式进行调用,我们将这部分给抽象到style.rs内部
// 在 style.rs 内
pub fn rule() -> iced::Rule {
    iced::Rule::horizontal(0).style(TransparentRule)
}
// 到了大家都讨厌的标注生存期环节了,我们将在后续给出是如何一步步标注出生存期的
// 这个函数逻辑不用多说,只需要知道是为了将Rule转换到Element并且收集到同一个Vec即可
+  pub fn rules<'a, Msg: 'a>(n: usize) -> Vec<Element<'a, Msg>> {
+      let mut res = Vec::with_capacity(n);
+      for _ in 0..n {
+          res.push(rule().into());
+      }
+      res
+  }
// 在添加了新的方法之后,我们可以将此前的代码变成这样:
// 在 note.rs 内
    column = column.push(
-       Row::new()
-       .push(style::rule())
-       .push(style::rule())
-       .push(style::rule())
-       .push(style::rule())
-       .push(style::rule())
-       .push(style::rule())
-       .push(style::rule())
+       Row::with_children(style::rules::<Message>(7))
        .push(delete)
        .push(style::rule()),
        );
现在让我们来看看rules这个函数是如何标注其生命期的,标注生命期的情况只有返回值带生命期的时候,才需要我们考虑,因为生命期本身代表的就是参数和返回值的生存期关系。当前我们需要返回一个
Vec<Element<'a,Msg>>,我们声明所需要的生命期参数:'a,同时也声明我们需要的Msg泛型,接着我们就可以正常写完我们的函数了。将函数补全之后,如果你直接编译的话,编译器会告诉你Msg活的时间不够长,这时候只需要在声明Msg的时候给它一个生存期限制,让它至少要活得比返回值Vec<Element<'a,Msg>>的生存期要长:Msg:'a。
如果熟悉Rust的数组,应该知道有个宏叫做vec!,可以方便的构建多个重复元素,因此这里我们应该还可以这样使用:
// 在 note.rs 内
-      Row::with_children(style::rules::<Message>(7))
+      Row::with_children(vec![style::rule().into();7])
        .push(delete)
        .push(style::rule()),
代码上也比之前定义函数更简洁,但实际上却不能这么做,这是由于当前版本的iced所带来的桎梏,使用vec!需要实现Clone这个trait,但是当前版本的iced并没有实现这个trait,因此如果这样实现的话,编译时会报错。
改进了这部分的代码质量之后,我们可以给我们的Note做更多美化了,首先考虑到之后需要实现暗色主题,因此需要给Note嵌套一层容器:
// 在 note.rs > impl NoteView > view 内
// 最后返回值,我们给他嵌套一个容器
-        column.into()
+        iced::Container::new(column)
// 同时添加一个note的style,需要读取theme,根据不同的theme形成不同的style
+             .style(style::note(theme))
+             .padding(10)
+             .into()

// 在 style.rs 内
// 我们定义一个Note结构体,用于表示Note的Style
+  pub struct Note {
+     theme: Theme,
+  }
// 我们给Note实现容器的StyleSheet
+  impl container::StyleSheet for Note {
+      fn style(&self) -> container::Style {
+          let (tcolor, bg_color, bd_color) = match self.theme {
// 根据不同的theme提供不同的文本颜色,背景颜色和边框颜色,目前只考虑亮色主题
+              Theme::Light => (
+                  Color::BLACK,
+                  Color::from_rgb8(240, 248, 255),
+                  Color::from_rgb8(240, 255, 255),
+              ),
+              Theme::Dark => todo!(),
+          };
+          container::Style {
+              text_color: Some(tcolor),
+              background: Some(Background::Color(bg_color)),
+              border_radius: 30.0,
+              border_width: 3.0,
+              border_color: bd_color,
+          }
+      }
+  }
+  pub fn note(theme: Theme) -> Note {
+      Note { theme }
+  }
完成以上操作之后,我们可以看看实现的效果,只要继续运行NoteView的预览即可:
细节上大家可以根据自己的喜好进行修改,现在我们给tag也实现风格:
// 在 style.rs 内
+  pub struct Tag {
+      theme: Theme,
+  }
+  impl button::StyleSheet for Tag {
+      fn active(&self) -> button::Style {
// 颜色这些随意,根据自己的喜好来就行
+          let (text_color, bg) = match self.theme {
+              Theme::Light => (
+                  Color::BLACK,
+                  Some(Background::Color(Color::from_rgb8(255, 182, 193))),
+              ),
+              Theme::Dark => (
+                  Color::WHITE,
+                  Some(Background::Color(Color::from_rgb8(173, 216, 230))),
+              ),
+          };
+          button::Style {
+              background: bg,
+              border_radius: 10.0,
+              border_width: 0.0,
+              border_color: Color::TRANSPARENT,
+              text_color,
+              ..Default::default()
+          }
+      }
+  }
+  pub fn tag(theme: Theme) -> Tag {
+      Tag { theme }
+  }
// 在 note.rs > impl NoteView > view 内
                let tag_button = Button::new(open_tag, Text::new(name.as_str()))
+                   .style(style::tag(theme))
                    .on_press(Message::Search(name.to_owned()));
再次运行:
接下来是二维码,仔细看的话,可以注意到底部是白色,和我们当前的Note背景色显得格格不入,因此我们同样将它设置成Note背景色:
// 在 style.rs 内
// 我们将背景色定义为常量,方便后续更改,需要注意的是from_rgb8这个方法并不是const函数,我们只能用from_rgb来调用
// 颜色随意,因为后续不好看还是需要改动的
+   const LIGHT_NOTE_BG: Color = Color::from_rgb(0.941, 0.972, 1.0);
+   const DARK_NOTE_BG: Color = Color::from_rgb(0.0784, 0.0863, 0.141);
   impl container::StyleSheet for Note {
       fn style(&self) -> container::Style {
           let (tcolor, bg_color, bd_color) = match self.theme {
-                          Theme::Light => (
-                  Color::BLACK,
-                  Color::from_rgb8(240, 248, 255),
-                  Color::from_rgb8(240, 255, 255),
-              ),
-              Theme::Dark => todo!(),
+               Theme::Light => (Color::BLACK, LIGHT_NOTE_BG, Color::from_rgb8(240, 255, 255)),
+               Theme::Dark => (Color::WHITE, DARK_NOTE_BG, Color::from_rgb8(20, 36, 36)),
           };
           container::Style {
               text_color: Some(tcolor),
               background: Some(Background::Color(bg_color)),
               border_radius: 30.0,
               border_width: 3.0,
               border_color: bd_color,
           }
       }
   }
+   pub fn qr_code(mut qr_code: qr_code::QRCode, theme: Theme) -> qr_code::QRCode {
+       let (dark, light) = match theme {
+           Theme::Light => (Color::BLACK, LIGHT_NOTE_BG),
+           Theme::Dark => (Color::WHITE, DARK_NOTE_BG),
+       };
+       qr_code.color(dark, light)
+   }
//  在 note.rs > impl NoteView > view 内
-       let qrcode = qrcode.as_ref().map(|state| QRCode::new(state));
+       let qrcode = qrcode
+           .as_ref()
+           .map(|state| style::qr_code(QRCode::new(state), theme));
再次运行:
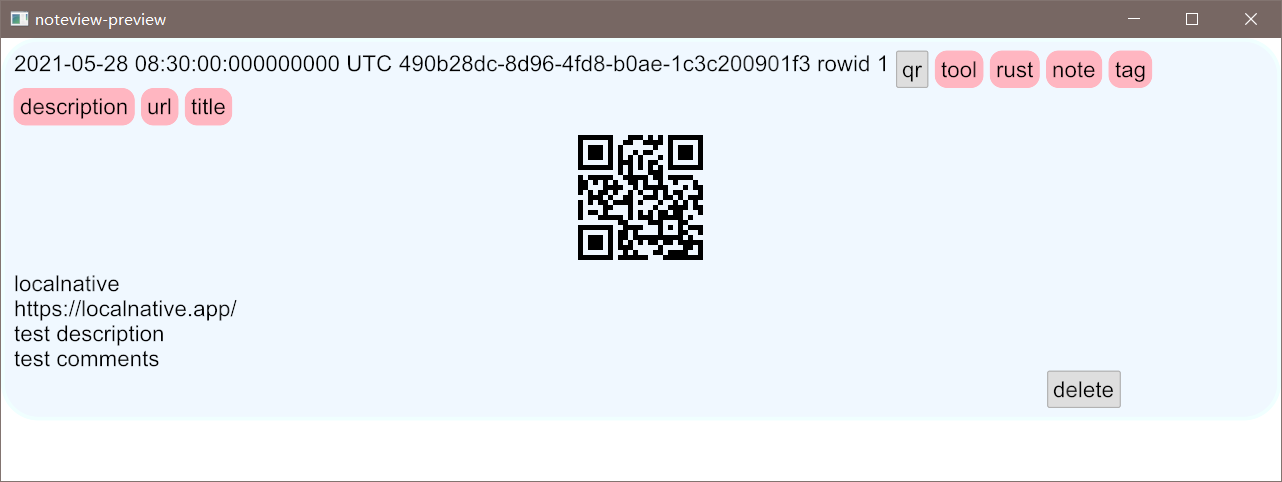
比之前稍微好看了一些,配色上还有待进步,后续有更好的设计,可以再切过来更改,现在还剩下二维码按钮和删除按钮没有进行添加样式,我们将在后续添加图标来替代,将会在添加字体的章节详细介绍。
至此,note的简易实现到此结束,下一章将会介绍第二个部分tags,同时也会介绍如何将多个实现的部分组合到一块:
课后练习(Quiz)
在本章内我们有使用到Message枚举体,比如下面这个:
#[derive(Debug, Clone)]
pub enum Message {
    OpenUrl,
    Delete,
    QRCode,
    Search(String),
}
其中Message::Search(String)就比较特殊,它是否可以当作方法来用呢?
A) 对于Rust中的元组结构体,都可以像方法一样去使用。
B)
并不能当作方法来使用,在Rust内只有使用fn关键字定义的方式才能当作方法使用。
C) 除了B选项之外,还能通过闭包的方式去定义,定义出来的也能当作方法去使用。但是元组结构体并不能和普通方法那样去使用。
答案(Explanation)
正确的选项是A选项,在Rust内,诸如闭包,实际上去掉语法糖之后,编译器在底层也是通过构建一个元组结构体的方式作为方法去接受参数的。